
You pull the starter cord, the engine fires up—then sputters and dies after a few seconds. You press the primer bulb, try again, and the same frustrating cycle repeats. This is one of the most common issues Toro snow blower owners face, especially with models like the CCR 2500 and PowerClear P-Tek. When your Toro snow blower starts then dies, the problem feels urgent, but the fix is often simpler than you think.
The real culprit is almost always a clogged carburetor, not a bad engine or empty tank. A blocked needle valve, dirty fuel passage, or gummed-up jet starves the engine of fuel right after startup. This guide walks you through diagnosing, cleaning, and rebuilding the carburetor step by step, using only the repair information that actually solves the problem.
Confirm the Symptom Pattern
Before grabbing any tools, verify the exact behavior. A Toro snow blower that starts then dies typically shows these signs:
- Runs for a few seconds up to a couple of minutes before stalling
- Temporarily restarts after pressing the primer bulb
- Requires repeated priming to stay running
- No visible fuel leaks or engine damage
If this matches your experience, you are likely dealing with intermittent fuel flow inside the carburetor, not a bad spark plug, ignition coil, or fuel tank.
Why Priming Works (Temporarily)
Pressing the primer bulb forces a small burst of fuel into the carburetor bowl. The engine runs briefly on that fuel until it is used up. If the needle valve or fuel passage is clogged, the bowl cannot refill automatically. Once the primed fuel burns off, the engine starves and dies.
This temporary revival pattern points directly to the carburetor, not the fuel line or tank.
Rule Out Vacuum and Fuel Supply Issues
Test with a Different Fuel Source
To isolate the problem, swap your fuel source:
- Disconnect the fuel line from the carburetor
- Attach a known-good fuel tank, such as one from a push mower
- Start the engine and observe the behavior
If the engine runs normally, the problem is in your original fuel tank, line, or filter. If it still dies, the issue is internal to the carburetor.
Check for Vacuum Lock
A sealed fuel tank without proper venting can create a vacuum that stops fuel flow. Remove the fuel cap and run the engine. If it runs longer or more consistently, the vent is blocked. If the problem persists even with the cap off, the issue is inside the carburetor.
Disassemble the Carburetor
Remove the Carburetor Safely
For models like the Toro CCR 2500 and PowerClear P-Tek with a Walbro 801167 carburetor:
- Shut off the fuel supply or drain the tank
- Disconnect the fuel line (use a rag to catch any drips)
- Remove the air filter housing
- Unscrew the carburetor mounting bolts
- Lift the carburetor out carefully
Label or photograph the connections before removing anything to make reassembly easier.
Inspect and Clean the Float Bowl
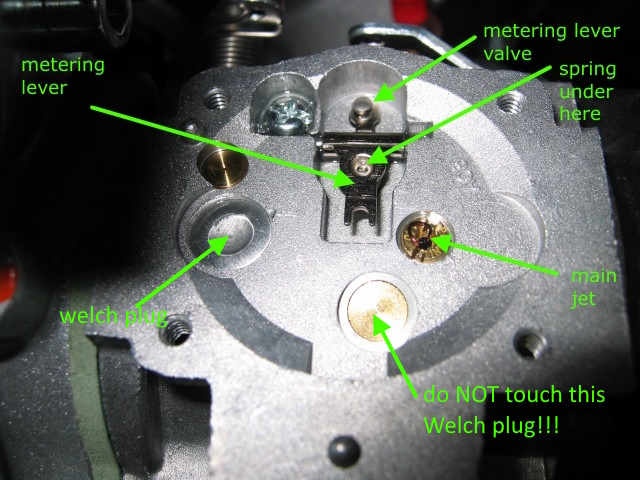
Remove the Bowl and Check the Jet
- Flip the carburetor upside down
- Remove the bowl screw, which also acts as the main jet
- Empty out any old fuel residue
Inspect the horizontal and vertical passages in the bowl screw. These tiny holes clog easily with varnish and debris.
- Soak the screw in carburetor cleaner
- Use a wire or thin drill bit to clear both holes
- Blow out with compressed air
A clogged bowl jet restricts fuel flow and mimics engine starvation.
Clean the Needle Valve and Seat
Why This Step Matters Most
The needle valve opens when the float drops, allowing fuel into the bowl. If the seat is clogged, the valve cannot open fully, even if it moves freely. A dirty needle valve seat is the most common cause of a Toro snow blower starting then dying.
Step-by-Step Cleaning
- Remove the float pin and lift out the float with the attached needle
- Look into the fuel inlet passage to find the red rubber seat at the bottom
- Remove the seat using one of these methods:
– A #5 crochet hook (the ideal tool)
– Compressed air blown through the inlet while covering the opening with your thumb
– A bent stiff paper clip as a last resort
Take care not to lose the seat or damage the passage during removal.
Clean the Inlet Passage
- Spray carburetor cleaner into the fuel inlet
- Use a thin wire to clear any remaining blockage
- Blow out with compressed air from both sides
Even a tiny speck of debris in this passage can stop fuel flow completely.
Install a New Needle Seat (Rebuild Kit)

When Replacement Is Needed
If the seat is cracked, swollen, or will not seal properly, replace it. You will need a Walbro 801427 rebuild kit and a replacement Walbro 801422 float if the original is damaged.
How to Install the New Seat
- Apply a drop of 3-in-1 oil or lighter fluid to the new seat as a lubricant
- Select a drill bit slightly smaller than the passage (such as 3/16 inch)
- Insert the seat with the rings facing down into the carburetor body
- Gently press it in using the back of the drill bit
- Confirm the seat is fully seated and flush
The lubricant helps the seat slide in smoothly and creates a better seal.
Check the Float Condition

Why Float Health Matters
A waterlogged or damaged float will not rise properly. This leaves the needle valve stuck open or closed, causing flooding or starvation.
Test the Float
- Shake it gently near your ear
- If you hear fuel sloshing inside, replace it
- Inspect for cracks or warping
- Ensure it pivots freely on the pin
Replace a faulty float with a Walbro 801422.
Proper Float Alignment
When reinstalling, the float should sit level when the carburetor is upside down. The needle should close fully when the float rises. Misalignment causes recurring running problems.
Clear the Brass Bolt Holes
What You Are Cleaning
At the bottom of the carburetor sits a brass bolt with a central hole and small side holes. These passages allow fuel to flow into the bowl. If they clog, the bowl cannot refill.
Cleaning Steps
- Remove the brass bolt
- Use a wire or small drill bit to clear every hole
- Spray with carburetor cleaner
- Blow out thoroughly with compressed air
Hold the bolt up to a light source to confirm all passages are fully clear.
Reassemble with New Gaskets
Why Gaskets Matter
Old or cracked gaskets cause air leaks that disrupt the fuel-air mixture. Use the gaskets included in the rebuild kit.
Reassembly Tips
- Reattach the needle to the float
- Insert the float pin and center it
- Reinstall the bowl screw with the new gasket
- Tighten securely but avoid over-torquing
Misaligned levers or pinched gaskets can cause the original problem to return.
Reinstall and Test the Carburetor
Final Setup
- Reconnect the fuel line
- Reattach the air filter
- Mount the carburetor back onto the engine
Start and Observe
- Prime 2 to 3 times
- Pull the starter cord
- Let the engine run without touching the primer
Signs of a successful fix:
– Engine runs for 5 or more minutes without dying
– No need for repeated priming
– Smooth idle and throttle response
If the engine still dies, double-check that all passages are clear, the needle seat is properly installed, and the float moves freely.
Prevent Future Carburetor Failures
Use Fresh Fuel
Old fuel turns to varnish and clogs carburetors quickly.
- Always use fresh gas and oil mix (for 2-cycle models)
- Mix at the correct ratio, typically 50:1
- Never store fuel in the tank over the summer
Add Fuel Stabilizer
For longer storage periods, use a quality stabilizer like Sta-Bil. Run the engine for 5 minutes to circulate the treated fuel through the system. This prevents gum and varnish buildup.
Clean the Carburetor Proactively
Before winter storage or when buying a used snow blower, remove and clean the carburetor. Replace the needle seat and gaskets as a preventive measure. This single step prevents most starts-then-dies issues.
When to Replace the Carburetor
Rebuild Versus Replace
A clean or rebuilt carburetor is almost always cheaper and more effective than a full replacement. Consider replacing only if the carburetor body is cracked, passages are corroded beyond cleaning, or rebuild parts are unavailable. For a Walbro 801167, a rebuild is usually faster and more reliable than swapping in a new unit.
Troubleshooting Flowchart
Engine starts then dies:
- Does priming help?
– Yes: Likely a fuel delivery issue
– No: Check spark, compression, and ignition - Does it run with an alternate fuel source?
– Yes: Fix the fuel line, filter, or tank
– No: Carburetor problem - Did thorough carburetor cleaning fix it?
– Yes: Problem solved
– No: Rebuild with a new seat and float - Did the rebuild work?
– Yes: Done
– No: Replace the carburetor
Key Parts and Tools
| Part | Part Number | Purpose |
|---|---|---|
| Carburetor Rebuild Kit | Walbro 801427 | Includes seat, gaskets, and needle |
| Float | Walbro 801422 | Replaces damaged or fuel-filled floats |
| Crochet Hook (#5) | N/A | Removes the needle seat easily |
| Carburetor Cleaner | Any aerosol | Cleans jets and passages |
| Compressed Air | Can or compressor | Blows out debris |
Frequently Asked Questions About Toro Snow Blowers Starting Then Dying
Why does my Toro snow blower start then die right away?
The most common cause is a clogged carburetor, especially a blocked needle valve seat or fuel passage. The engine fires on primed fuel, then starves when the bowl cannot refill.
Can a bad fuel cap cause a Toro snow blower to stall?
Yes, a clogged fuel cap vent can create a vacuum that stops fuel flow. Try running the engine with the cap off. If it runs longer, replace or vent the cap.
How do I know if my carburetor needs cleaning or replacing?
Clean it first. If the body is cracked, passages are corroded, or rebuild parts are unavailable, replacement becomes the better option.
What carburetor does a Toro PowerClear P-Tek use?
The Toro PowerClear P-Tek uses a Walbro 801167 carburetor, which can be rebuilt with kit Walbro 801427.
How long should I soak carburetor parts in cleaner?
Soak parts for up to 24 hours for tough buildup. An ultrasonic cleaner works well as an alternative.
Will fresh fuel fix a Toro snow blower that starts then dies?
Fresh fuel helps prevent the problem but will not fix an already clogged carburetor. Cleaning or rebuilding the carburetor is required.
Key Takeaways for Fixing Your Toro Snow Blower
The “starts then dies” issue almost always traces back to the carburetor, not the engine or fuel tank. Focus your repair on the needle valve seat, fuel inlet passage, and brass bolt holes. Replace the float if it feels heavy or contains fuel, and always use fresh fuel with stabilizer during storage.
Start by cleaning the carburetor thoroughly. If problems persist, perform a full rebuild with a Walbro 801427 kit. With patience and the right steps, your Toro snow blower will start reliably and run strong all winter. No expensive replacements needed, just a careful cleaning and a few affordable parts.



