
You pull the starter cord expecting that familiar roar—nothing. After months in storage, your snow blower cranks but refuses to fire. This frustrating scenario happens to thousands of homeowners every winter. The top three culprits are old fuel, a clogged carburetor jet, and simple setup mistakes like a missing safety key or closed fuel valve. Even with fresh gas in the tank and a strong spark, tiny blockages in the carburetor can stop your engine cold.
The good news? Most snow blower won’t start problems are fixable in under 30 minutes using basic tools and a few proven steps. This guide walks you through a complete diagnostic and repair process without guesswork. You will learn how to verify fuel delivery, test for spark, clean a clogged carburetor jet, and prevent future breakdowns. Whether you own a two-stage machine or a basic single-stage unit, these fixes work across brands and models.
Verify the Starting Setup First
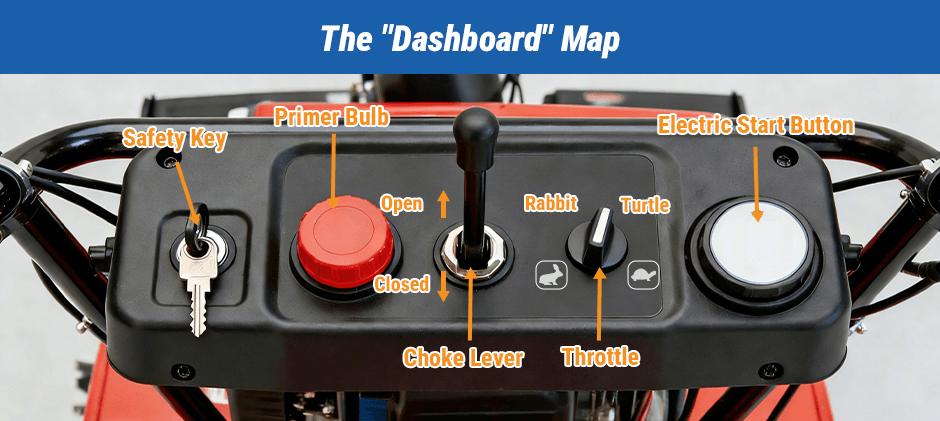
Before you tear into the engine, confirm your snow blower is configured correctly. Many “no-start” complaints trace back to simple oversights that take seconds to fix.
Check the Safety Key
The safety key must be fully inserted for the ignition system to engage. If it is missing or loose, the engine will not start no matter what else you do.
• Locate the key—often stored on the machine or in your accessory kit
• Insert it firmly into the designated slot near the control panel
• This single step solves more no-start cases than people realize
Set the Choke to Full
For a cold engine, the choke must be fully engaged to enrich the fuel mixture.
• Find the choke lever, usually marked with symbols near the engine
• Move it to the full choke (closed) position
• This delivers extra fuel to help ignition in cold conditions
Press the Primer Bulb 3 to 5 Times
If your model has a primer bulb, do not skip this step.
• Press it 3 to 5 times firmly
• This pushes fresh fuel into the carburetor
• Even if the tank looks full, the carburetor may be dry
Confirm the Fuel Valve Is Open
Some snow blowers feature a fuel shutoff valve on the fuel line.
• Make sure it is set to the “ON” position
• A closed valve starves the engine and prevents startup
• This is a common issue after maintenance or transport
Engage the Ignition Switch
Many engines have a small ignition switch on the back of the unit.
• Press and hold it down while pulling the starter cord
• A loose or disengaged switch stops the spark from firing
Test Whether Fuel Is Reaching the Engine

If the setup checks out but it still will not start, determine whether fuel is actually reaching the combustion chamber.
Inspect Fuel Level and Freshness
Remove the gas cap and look inside the tank.
• Verify there is visible liquid fuel, not just vapor or residue
• Even a small amount may not be enough to run
• Ethanol-blended fuel degrades in just 30 days—if it has been sitting longer, drain it
• Refill with fresh, unleaded gasoline
• For long-term storage, use ethanol-free fuel or add a quality stabilizer
Check the Spark Plug for Fuel
This simple test reveals whether fuel is getting to the cylinder.
• Remove the spark plug using a spark plug wrench (5/8″ or 13/16″ socket)
• Examine the tip:
• Wet with fuel → Fuel is reaching the engine; move to spark testing
• Dry → Fuel is not arriving; the carburetor or fuel line is the problem
Diagnose the Ignition System
Even with fuel in the cylinder, your engine needs a spark to fire. Test the ignition system next.
Use a Spark Tester
A spark tester gives a more reliable reading than checking the plug alone.
• Connect the tester between the spark plug wire and a grounded metal surface like the engine block
• Pull the starter cord firmly
• Visible spark = ignition system works
• No spark = check connections or replace the plug
Secure the Spark Plug Wire
A loose wire is a frequent and easily overlooked cause of no-start.
• Remove the housing cover if needed to access the plug
• Unplug and firmly reconnect the wire
• Make sure it is fully seated and snug
Replace the Spark Plug if Needed
Even when spark is present, a fouled plug can prevent starting.
• Install a new, OEM-compatible spark plug
• Hand-thread it first to avoid cross-threading the cylinder head
• Tighten one-quarter turn past snug—over-tightening can cause costly damage
• Reconnect the wire and leave the cover off for testing
Clean the Carburetor Jet
If fuel and spark are both confirmed but the engine still refuses to start, the main jet or emulsion tube is almost certainly clogged. This is the number one cause of post-storage no-start issues, because old fuel breaks down and leaves varnish that blocks tiny fuel passages.
Drain Old Fuel First
Prevent contaminated fuel from cycling back through the system.
• Remove the fuel cap to release pressure
• Locate the drain bolt on the side of the carburetor (not the bowl nut)
• Open it and let the old fuel drain completely into a safe container
• Pro tip: If your snow blower has no fuel shutoff, clamp the fuel line during storage
Remove the Carburetor Bowl
Access the internal jets and tubes.
• Use a wrench to unscrew the bowl nut
• Carefully lift off the bowl
• Caution: The float and needle valve are inside—do not lose them
Extract the Main Jet and Emulsion Tube
• Find the main jet—a small brass screw inside the carburetor
• Unscrew it with a flathead screwdriver
• Locate the emulsion tube directly above it—a longer, tube-shaped piece
• Remove both components
• Note the orientation of the emulsion tube; it must go back exactly the same way
Clear the Clogged Jet
Old fuel varnish blocks the jet’s tiny hole and stops fuel flow.
• Spray carb cleaner (such as Gumout Carb & Choke Parts Cleaner) directly into the jet
• Push a thin wire like a safety pin or carb cleaning tool through the hole until clear
• Blow out debris with compressed air or wipe with a clean rag
• For stubborn buildup, soak both parts in carb cleaner for 5 to 10 minutes
Reassemble the Carburetor
Put everything back in the correct order to prevent leaks.
• Reinstall the emulsion tube first, pointing in the original direction
• Insert the main jet with the small end down
• Screw it in snugly—righty-tighty, but do not over-tighten
• Place the bowl back on and secure with the bowl nut
• Confirm the drain bolt is exposed for future maintenance
Try Starting the Engine Again
After cleaning, follow the proper startup sequence.
1. Add fresh fuel (ethanol-free is ideal)
2. Set the choke to full
3. Press the primer bulb 3 times
4. For electric start: plug in and press the start button
5. For pull start: pull the cord firmly
6. Once it fires, turn off the choke after 10 to 15 seconds
7. Let it warm up with the choke in the middle position for 1 to 2 minutes
8. Then fully open the choke for normal operation
The engine should fire within three pulls if everything is set up correctly.
Troubleshoot If It Still Won’t Start
When the engine refuses to cooperate, revisit these key areas.
Recheck Fuel Flow
• Confirm the fuel valve is ON
• Ensure the tank holds fresh fuel
• Inspect the spark plug again—a dry tip confirms no fuel delivery
Re-test for Spark
• Use the spark tester once more
• No spark means checking:
• Spark plug wire connection
• Ignition coil
• Safety key and kill switch
Consider Low Compression
If the engine spins freely but never fires, low compression may be the issue.
• This requires professional diagnosis and repair
• Do not continue cranking, as it can damage the starter
Inspect the Air Filter
A clogged air filter restricts airflow and prevents combustion.
• Remove the filter and hold it up to a light source
• If it is dirty or blocked, clean or replace it
• This is a quick check many people overlook
Prevent Future Starting Problems

Avoid next winter’s frustration with a few simple storage habits.
Use a Fuel Stabilizer
• Add STA-BIL 360 Protection (alcohol-free) to fresh fuel before storage
• Run the engine for 5 minutes to circulate the stabilized fuel through the system
• Keeps fuel fresh for up to 12 months and prevents varnish buildup
Store with a Full Tank
• A full tank of stabilized fuel prevents moisture from condensing inside
• Reduces air space where fuel can oxidize and degrade
Drain Fuel or Clamp the Line
• If you do not use stabilizer, drain the tank and carburetor before storage
• If there is no fuel shutoff, clamp the fuel line to stop flow
Store in a Dry, Covered Area
• Moisture causes corrosion on critical engine parts
• Keep the machine covered and off concrete when possible
When to Call a Professional
Some issues are best left to certified technicians.
Seek Expert Help If:
• All troubleshooting steps have failed
• You are uncomfortable disassembling the carburetor
• Compression tests reveal low readings
• The ignition coil or internal engine components appear faulty
Certified service dealers have the tools and experience to diagnose deeper mechanical problems and perform precision repairs.
Frequently Asked Questions About Snow Blowers That Won’t Start
Why does my snow blower start then die?
This usually points to a fuel delivery issue. The engine fires on the primer fuel but stalls because the carburetor is not delivering a steady supply. A clogged main jet, empty tank, or closed fuel valve are the most common causes. After it dies, check the spark plug tip—a dry tip confirms the carburetor is starved.
Can old gas prevent a snow blower from starting?
Yes, absolutely. Ethanol-blended gasoline begins degrading in as little as 30 days, leaving varnish and gum that clog the carburetor’s tiny passages. Even fuel that looks and smells fine can be too stale to ignite properly. Drain any fuel older than one month and refill with fresh, unleaded gasoline.
How do I know if my snow blower spark plug is bad?
Remove the plug and inspect the tip. A healthy plug has light tan or gray deposits. A black, oily, wet, or cracked plug needs replacement. You can also test for spark by reconnecting the plug to the wire, grounding the metal base against the engine, and pulling the cord. No visible spark means the plug is likely bad.
Do I need to drain fuel from my snow blower before winter storage?
Draining is one option, but using a fuel stabilizer is easier and more effective. Add STA-BIL 360 Protection to fresh fuel, run the engine for 5 minutes to coat internal parts, and store with a full tank. This prevents varnish buildup and keeps the carburetor clean for up to 12 months.
Why does my snow blower only run with the choke on?
Running only on full choke means the engine is not getting enough fuel at the normal air-to-fuel ratio. The choke artificially enriches the mixture to compensate. A clogged main jet, dirty air filter, or faulty carburetor are the likely culprits. Cleaning the carburetor jet usually resolves this issue.
Key Takeaways for Fixing a Snow Blower That Won’t Start
A snow blower won’t start problem almost always traces back to one of three issues: stale fuel, a clogged carburetor jet, or a basic setup mistake. Always check the safety key, choke position, fuel valve, and primer bulb before diving deeper. Remember that ethanol-blended fuel degrades in just 30 days, so draining or stabilizing old gas is essential. When cleaning the carburetor, focus on the main jet and emulsion tube—not just the bowl. Use carb cleaner and a thin wire to clear stubborn clogs.
With the right steps and a handful of basic tools, most no-start issues are quick, affordable fixes. No expensive shop visit required—just fresh fuel, a clean carburetor, and proper setup. Spend a few minutes on maintenance now, and your snow blower will fire up reliably all season long.



