Your snow blower is running, but instead of launching snow out the chute, it’s just pushing it around the driveway. Whether the auger spins freely without throwing or refuses to turn at all, you’re stuck with a mountain of snow and a machine that won’t cooperate. You’re not alone. This is the most common snow blower complaint homeowners face, and the culprit is usually something simple you can fix in under 30 minutes.
Below, you’ll find every major cause of a snow blower not blowing snow, how to test for each one, and step-by-step repair instructions. Whether you own a single-stage, two-stage, or tractor-mounted blower, this guide will get you back to clearing driveways before the next storm.
Start by Checking the Shear Bolts

Why Shear Bolts Are the #1 Suspect
Shear bolts are sacrificial parts designed to snap when your auger hits a rock, chunk of ice, or hidden debris. This protects your gearbox and engine from catastrophic damage. When a shear bolt breaks, power stops reaching the auger or impeller, even though the engine runs fine. If your snow blower auger won’t turn at all, broken shear bolts are the most likely reason.
How to Inspect Shear Bolts Properly
- Shut off the engine and disconnect the spark plug wire.
- Locate the shear bolts at the base of each auger shaft.
- Look for visible cracks, shearing, or missing bolts.
- On some models, bolts can break but stay in place and appear intact. Remove each bolt to inspect closely.
Replace Shear Bolts the Right Way
- Use only the manufacturer-recommended size, typically grade 2, 1/4″ bolts.
- Never substitute hardened bolts. They won’t break under stress and will transfer that force directly to the gearbox, causing expensive damage.
- Keep spares in your garage or the storage compartment under the hood. Buy extras now before the next storm.
Pro Tip: Most snow blowers ship with 1–2 spare shear pins. Replace them after you use one so you’re never caught without a backup.
Inspect the Drive Belt for Wear or Damage
Signs Your Belt Has Failed
- Auger doesn’t turn when you engage the drive
- Squealing noise during operation
- Visible cracks, fraying, or slack in the belt
The drive belt transfers power from the engine to the auger and impeller pulleys. A stretched, cracked, or broken belt means no power reaches the snow-moving parts, even if everything else works.
How to Replace the Drive Belt
- Disconnect the spark plug.
- Remove the belt cover. Take a photo of the belt routing first.
- Release the tensioner and slide off the old belt.
- Install the new belt following the exact same routing.
- Verify pulley alignment and proper tension.
- Reinstall the cover and test the machine.
Warning: Use only the belt size and type specified in your manual. Wrong belts slip, wear out fast, and can damage pulleys.
Clear an Impeller Blockage

Why the Impeller Matters in Two-Stage Blowers
In two-stage snow blowers, the impeller is the high-speed fan behind the auger that throws snow out the chute. Even if your auger spins normally, a jammed or damaged impeller stops snow from exiting the machine.
How to Clear and Inspect the Impeller
- Shut off the engine and disconnect the spark plug.
- Shine a flashlight into the discharge chute.
- Look for compacted snow, ice, or debris blocking the impeller.
- Clear blockages with a broom handle or plastic tool. Never use your hands.
- Check the impeller fins for cracks, bending, or breakage.
When to Replace the Impeller
If fins are cracked, bent, or missing pieces, replace the impeller. Damage reduces throwing distance and can cause dangerous vibrations during operation.
Expert Note: After clearing wet, heavy snow, always clean the chute before storing. Residual moisture refreezes overnight and locks up components.
Fix Auger Clocking on Double-Auger Blowers
What Auger Clocking Means
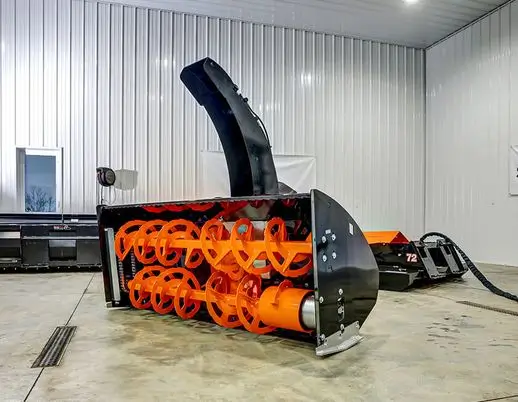
In double-auger snow blowers, the two augers must be 180° out of phase so they feed snow evenly into the impeller. If both augers are aligned at 0° or offset by only 90°, they dump snow into the impeller faster than it can expel it. The result: snow piles up at the front instead of flying out the chute.
How to Correct Auger Clocking
- Disconnect the spark plug.
- Loosen the auger mounting hardware.
- Rotate one auger until the blades are offset by 180° from the other.
- Tighten the hardware securely and verify clearance.
- Test the blower at low speed.
Case Study: A Lorenz double-auger owner fixed persistent pushing behavior by correcting 90° clocking to 180°. No replacement parts were needed.
Test the Chain and Sprocket System

Common Chain and Sprocket Problems
- Loose or broken chain
- Misaligned sprockets
- Worn or missing chain links
In double-auger models, chains connect the augers to the drive system. A loose or broken chain cuts power transfer and leaves you with a snow blower not throwing snow.
How to Diagnose and Fix
- Inspect each chain for proper tension and visible damage.
- Check sprocket alignment. Misalignment causes rapid wear.
- Replace broken chains with OEM or compatible parts.
- Adjust tension according to manufacturer specifications.
Visual Cue: If one auger spins and the other doesn’t, check the chain on the non-spinning side first.
Look for Sheared Drive Keys

What a Drive Key Does
A small metal key fits between a shaft and its pulley or sprocket to prevent slippage. When the key shears, the pulley may spin freely without turning the connected shaft, which means no power reaches the auger or impeller.
How to Test for a Sheared Key
- With the engine off, try spinning the auger by hand.
- If the PTO shaft or impeller doesn’t rotate, suspect a sheared key.
- Hold the auger and fan together. If turning one doesn’t spin the other, the connecting key is likely broken.
How to Replace a Sheared Key
- Remove the affected component.
- Extract the broken key with pliers or a pick.
- Install a new key of the correct size.
- Reassemble and test the machine.
Warning: Inspect the keyway slot for damage. Worn or widened slots require professional repair.
Verify Engine and PTO Speed
Why RPM Affects Throwing Performance
Low engine speed or insufficient PTO RPM reduces auger feed rate and impeller force. The blower may push snow along the ground instead of launching it out the chute, even when all mechanical parts are intact.
How to Optimize Speed Settings
- Run the engine at high idle or full throttle when blowing snow.
- Make sure the PTO is fully engaged.
- Check for throttle linkage issues or governor problems that limit RPM.
User Tip: One L3301HST owner found that running the PTO at high RPM dramatically improved blowing performance, even with all mechanical components in good condition.
Adjust for Snow and Ground Conditions
How Weather and Terrain Affect Performance
Even a perfectly functioning snow blower can struggle in certain conditions. Here’s what to watch for:
- Wet snow: Sticks together and pushes easily. Slightly increase ground speed to improve throwing.
- Shallow snow (under 3 inches): Often causes pushing because there’s not enough material for the auger to grab.
- Icy or compacted ground: Slick surfaces make snow slide instead of lift.
Best Practices for Tough Conditions
- Start at low speed and increase gradually if pushing occurs.
- Use the “behead and reverse” technique for stubborn drifts:
1. Raise the blower off the ground.
2. Reverse a few feet.
3. Drive forward with momentum to break the drift.
4. Lower the blower and resume normal blowing.
Prevent Ice and Debris Buildup
Why Blockages Form Overnight
Leftover snow melts from engine heat, then refreezes inside the auger housing or chute. By morning, components can be frozen solid.
How to Prevent Buildup
- Clean the machine after every use. Run the auger for 30 seconds to blow out residual moisture.
- Spray the chute and auger housing with non-stick silicone spray.
- Store the blower in a dry location.
- Add fuel stabilizer to prevent starting issues.
Pro Tip: Never store your snow blower with snow or ice inside. Thaw and clean it first, or you’ll face a frozen mess next time you need it.
Replace Worn Auger Blades
Signs Your Blades Are Worn Out
- Reduced snow pickup at the housing
- Uneven clearing patterns
- Visible cracks, rounding, or warping on blade edges
Worn blades can’t scoop snow effectively, which leads to poor throwing performance even when everything else works.
How to Replace Auger Blades
- Disconnect the spark plug.
- Remove the bolts securing the worn blade.
- Install the new blade. Many models allow individual replacement.
- Torque bolts to spec without over-tightening.
Note: Some auger assemblies must be replaced as a complete unit if the housing or shaft is also damaged.
Recognize Design Limitations in Older Models
Why Vintage Blowers May Underperform
Older double-auger blowers, like the 1960s McKee/Snowlander 720, often have inherent design flaws. The second auger feeds snow into the impeller faster than the 3-blade fan can expel it. The result is chronic pushing, no matter how well you maintain the machine.
Solutions for Design-Limited Blowers
- Slow down. Older units perform better at reduced ground speed.
- Modify the impeller or upgrade to a modern blower.
- Verify power match. A 24–25 HP tractor may still be underpowered for some double-auger setups.
Follow a Preventive Maintenance Schedule
Seasonal Maintenance Checklist
- Clean the machine after each use
- Inspect shear bolts monthly during the season
- Check belt tension and condition
- Lubricate chains, sprockets, and moving parts
- Verify auger clocking on double-auger models
- Store with fresh fuel and stabilizer
Spare Parts to Keep on Hand
| Part | Why It Matters |
|---|---|
| Shear bolts | Most common failure point |
| Drive belt | Prevents downtime during storms |
| Spark plug | Fouled plugs cause hard starting |
| Auger blades | Wear over time and reduce pickup |
Know When to Call a Professional
Seek Expert Help If You Notice These Signs
- You can’t identify the problem after basic checks
- You suspect gearbox or internal transmission damage
- You lack the tools or experience for the repair
- The machine is still under warranty
Finding a Trusted Repair Shop
Look for local shops with snow blower expertise. Community forums and neighborhood recommendations are great resources. Shops familiar with older and tractor-mounted models are especially valuable if you own specialty equipment.
Frequently Asked Questions About Snow Blowers Not Blowing Snow
Why is my snow blower auger not turning at all?
The most common cause is a broken shear bolt or pin. These sacrificial parts are designed to snap when the auger hits an obstacle, protecting the gearbox. Inspect the bolts at the base of each auger shaft and replace any that are cracked, sheared, or missing.
What does it mean if my auger turns but no snow comes out?
This usually points to an impeller problem. The impeller is the high-speed fan that throws snow out the chute. Check for blockages from ice or compacted snow, and inspect the impeller fins for cracks or bending.
Can a drive belt stop my snow blower from throwing snow?
Yes. The drive belt transfers power from the engine to the auger and impeller. If it’s stretched, cracked, or broken, no power reaches the snow-moving components. Look for fraying, glazing, or visible damage, and replace with the correct size belt.
Why does my snow blower push snow instead of blowing it?
Pushing behavior has several possible causes: incorrect auger clocking, low PTO or engine RPM, shallow snow depth, wet snow, slick ground conditions, or worn auger blades. Start by checking speed settings and auger alignment.
How do I know if my shear bolt broke but is still in place?
On some models, particularly Lorenz double-auger blowers, shear bolts can break completely but remain seated in the housing, looking intact. The only way to confirm is to remove each bolt and inspect it closely.
Is it safe to use a hardened bolt instead of a shear pin?
No. Never replace shear pins with hardened bolts. Hardened bolts won’t break under stress, which means the full force of an impact transfers directly to the gearbox. This can cause permanent, expensive damage that a $2 shear pin would have prevented.
Key Takeaways for Fixing a Snow Blower Not Blowing
A snow blower not blowing snow is almost always fixable with basic tools and a little troubleshooting. Start your diagnosis with shear bolts, since they’re the most common failure point on both single-stage and two-stage machines. From there, check the drive belt, impeller for blockages, and auger clocking on double-auger models.
Most repairs take under 30 minutes once you’ve identified the problem. Keep spare shear bolts, a replacement belt, and basic tools on hand so a mid-storm breakdown doesn’t leave you stranded. Run your machine at full throttle, clean it after every use, and address small issues before they become major repairs.
Now that you know where to look and what to fix, grab your tools and get that blower throwing snow again. Your driveway (and your back) will thank you.