
If your Husqvarna snow blower won’t start, loses power, or fails to throw snow despite spinning augers, you’re not alone. Many owners face recurring Husqvarna snow blower problems, from fuel-related starting issues to mechanical failures like impeller shaft breakdowns. While the brand carries a reputable name, real-world performance often falls short, especially in heavy snow or cold conditions.
This guide cuts through the frustration with clear, step-by-step solutions based on verified repair data and user experiences. You’ll learn how to diagnose and fix the most common issues, starting with simple checks and progressing to mechanical repairs. Whether you own a Husqvarna ST224 or another model, this troubleshooting roadmap covers fuel system fixes, spark plug checks, impeller failures, and more, all without replacing entire components unnecessarily.
Fix Starting Problems First
Starting issues are the most frequent complaint with Husqvarna snow blowers. Before assuming engine failure, rule out preventable fuel and ignition problems.
Use Fresh, Clean Fuel
Old or contaminated fuel is a top cause of no-start conditions. Husqvarna engines require:
– Unleaded gasoline with 87 octane or higher
– Maximum 10% ethanol (E10), so avoid E20, E30, or E85
– No oil/fuel mixtures (a common mistake with 2-cycle engines)
If fuel is old (over 30 days):
1. Drain the fuel tank completely
2. Remove and drain the carburetor bowl
3. Refill with fresh fuel
Pro Tip: Add a fuel stabilizer if storing for more than a month.
Check Choke and Throttle Settings
Incorrect settings prevent cold starts:
– Choke: Must be ON for cold starts
– Throttle: Set to FAST, not slow or idle
If the engine floods:
– Turn choke OFF
– Set throttle to full
– Wait 3–5 minutes
– Pull starter without re-priming
Confirm Fuel Switch is ON
A simple but often overlooked step:
– Locate the fuel shutoff valve (usually near the tank base)
– Ensure it’s set to ON to allow fuel flow
– If off, no fuel reaches the carburetor and the engine won’t start
Prime Correctly or Fix Flooding
Normal start:
– Press primer bulb 3–5 times until firm
– Do not over-prime
Flooded engine:
– Wait 5–10 minutes for fuel to evaporate
– Do not press the primer
– Set throttle to full
– Disengage choke
– Pull starter slowly
Inspect the Spark Plug
A faulty spark plug kills ignition. Check:
– Cap is securely attached
– Electrode is clean with no carbon buildup
– Gap is correct (refer to manual, typically 0.028–0.031 inches)
Replace if:
– Cracked insulator
– Burnt or eroded electrode
– Wet with fuel (a sign of flooding)
Warning: Always disconnect the spark plug wire before servicing.
Replace Clogged Fuel Filter
A blocked filter starves the engine:
– Located in the fuel line between tank and carburetor
– Remove and inspect for debris or cloudiness
– Replace with OEM or compatible inline filter
Time Estimate: 10 minutes
Difficulty: Easy
Diagnose Engine Performance Failures

Even when running, Husqvarna snow blowers may underperform or fail prematurely.
Address Cold Weather Starting Issues
Starting in sub-zero temps demands extra care:
– Use winter-grade fuel (ethanol-free preferred)
– Store in a garage or sheltered area
– Pre-warm the engine with a heat gun (never use an open flame)
– Consider a battery-powered jump starter with cold-cranking amps
Avoid: Repeated rapid pulls, which can flood the engine.
Handle Premature Engine Failure
Users report engines failing early, even with light use:
– Causes: Poor fuel quality, lack of maintenance, or manufacturing defects
– Prevention: Follow break-in procedures and change oil annually
If the engine seizes:
– Check oil level, as overfilling can hydro-lock the crankcase
– Drain excess oil if overfilled
– Rotate the flywheel by hand to test for binding
Clean the Carburetor
Dirty carburetors cause:
– Hard starting
– Rough idling
– Power loss
Cleaning steps:
1. Remove the carburetor (disconnect fuel line and throttle linkage)
2. Disassemble and soak in carb cleaner
3. Blow out jets with compressed air
4. Reassemble and reinstall
Alternative: Use a carburetor cleaning kit with a spray solvent.
Pro Tip: Replace gaskets when reassembling to prevent leaks.
Solve Snow Discharge Failures

When augers spin but snow doesn’t exit the chute, the problem isn’t the gearbox. It’s the impeller drive.
Diagnose “Augers Spin, Impeller Doesn’t”
Common in: Husqvarna ST224 and other Murray-built models
Symptoms:
– Augers turn and chew snow
– Impeller remains stationary
– Snow piles up inside housing
Root Cause: Sheared key or broken impeller shaft
Unlike gearbox failure (where augers stop), this issue means power isn’t transferring from the gearbox to the impeller.
Inspect the Impeller Shaft
Safety First:
– Turn off engine
– Remove spark plug wire
– Place on level ground
Steps:
1. Remove impeller housing bolts with a socket wrench
2. Lift off housing carefully
3. Examine the impeller shaft where it connects to the gearbox
4. Look for:
– Missing or broken drive key (a small rectangular metal piece)
– Shaft spinning freely without turning the impeller
– Visible wobble or misalignment
Visual Cue: If you can wiggle the shaft independently, the connection is broken.
Replace Impeller Shaft Assembly
Do not replace the entire gearbox. Only the shaft and key need replacement.
For ST224:
– Part # 561211401 (impeller shaft assembly)
– Includes keyed shaft and mounting hardware
Installation:
1. Slide new shaft into gearbox output
2. Align keyway and insert drive key snugly
3. Secure impeller and housing
4. Torque bolts to spec (check manual)
Test: Start engine and verify both augers and impeller spin together.
Time Estimate: 45–60 minutes
Difficulty: Moderate
Prevent Future Shaft Failures
Avoid sudden impacts that shear the key:
– Clear rocks, ice chunks, and debris before use
– Don’t force the blower into packed snow
– Use lower speeds on uneven surfaces
Upgrade Option: Some users install reinforced aftermarket shafts for durability.
Repair Auger and Drive Problems
Auger failures usually stem from shear pins or worn belts.
Replace Broken Shear Pins
Shear pins protect the auger gearcase from damage.
Symptoms of a broken pin:
– One or both augers don’t turn
– Clicking or grinding noise
Fix:
1. Locate shear pins (through auger ends)
2. Remove retaining clips or cotter pins
3. Extract broken pin
4. Insert new pin (OEM recommended)
5. Reattach clips
Pro Tip: Keep spare shear pins on hand, as replacement takes under 5 minutes.
Check and Replace Worn Belts
Belts wear over time, causing slippage or no drive.
Signs of belt failure:
– Auger or drive wheels don’t engage
– Squealing noise
– Visible cracks or fraying
Replacement Steps:
1. Remove belt cover
2. Release tension (adjust idler pulley)
3. Slide off old belt
4. Install new belt following the routing diagram
5. Re-tension and test
Note: Refer to your model’s manual for correct belt type and routing.
Address Design and Handling Flaws
Even when mechanically sound, Husqvarna snow blowers face usability complaints.
Reduce Vibration and Fatigue
Excessive vibration leads to hand numbness and joint strain:
– Causes: Imbalanced auger, worn bearings, loose components
– Fix: Inspect impeller and auger for damage; tighten all bolts
Prevention: Use anti-vibration gloves and take breaks during long sessions.
Improve Maneuverability
Husqvarna models are heavier than competitors:
– Hard to turn in tight spaces
– Challenging for users with limited strength
Workarounds:
– Clear narrow paths in stages
– Use two-handed control for better steering
– Consider single-stage models for lighter snow
Upgrade Chute Control
Poor chute rotation and locking mechanisms lead to:
– Inaccurate snow direction
– Frequent readjustment
Fix:
– Lubricate chute collar with silicone spray
– Tighten adjustment knob
– Replace broken chute crank if needed
Assess Build Quality and Reliability
Despite the brand name, many users report poor durability.
Common Failure Points
Based on user reports:
– Impeller shaft/key failure — even on low-hour machines
– Premature engine wear — within the first 2–3 seasons
– Transmission issues — slipping, grinding, or no drive
– Plastic housing cracks — from impact or cold weather
Evaluate Warranty and Support
Customer service receives low marks:
– Denial of claims for “normal wear”
– Difficulty sourcing genuine parts
– Long repair turnaround times
Recommendation: Document all maintenance and keep receipts, which helps with warranty disputes.
Follow a Preventive Maintenance Checklist
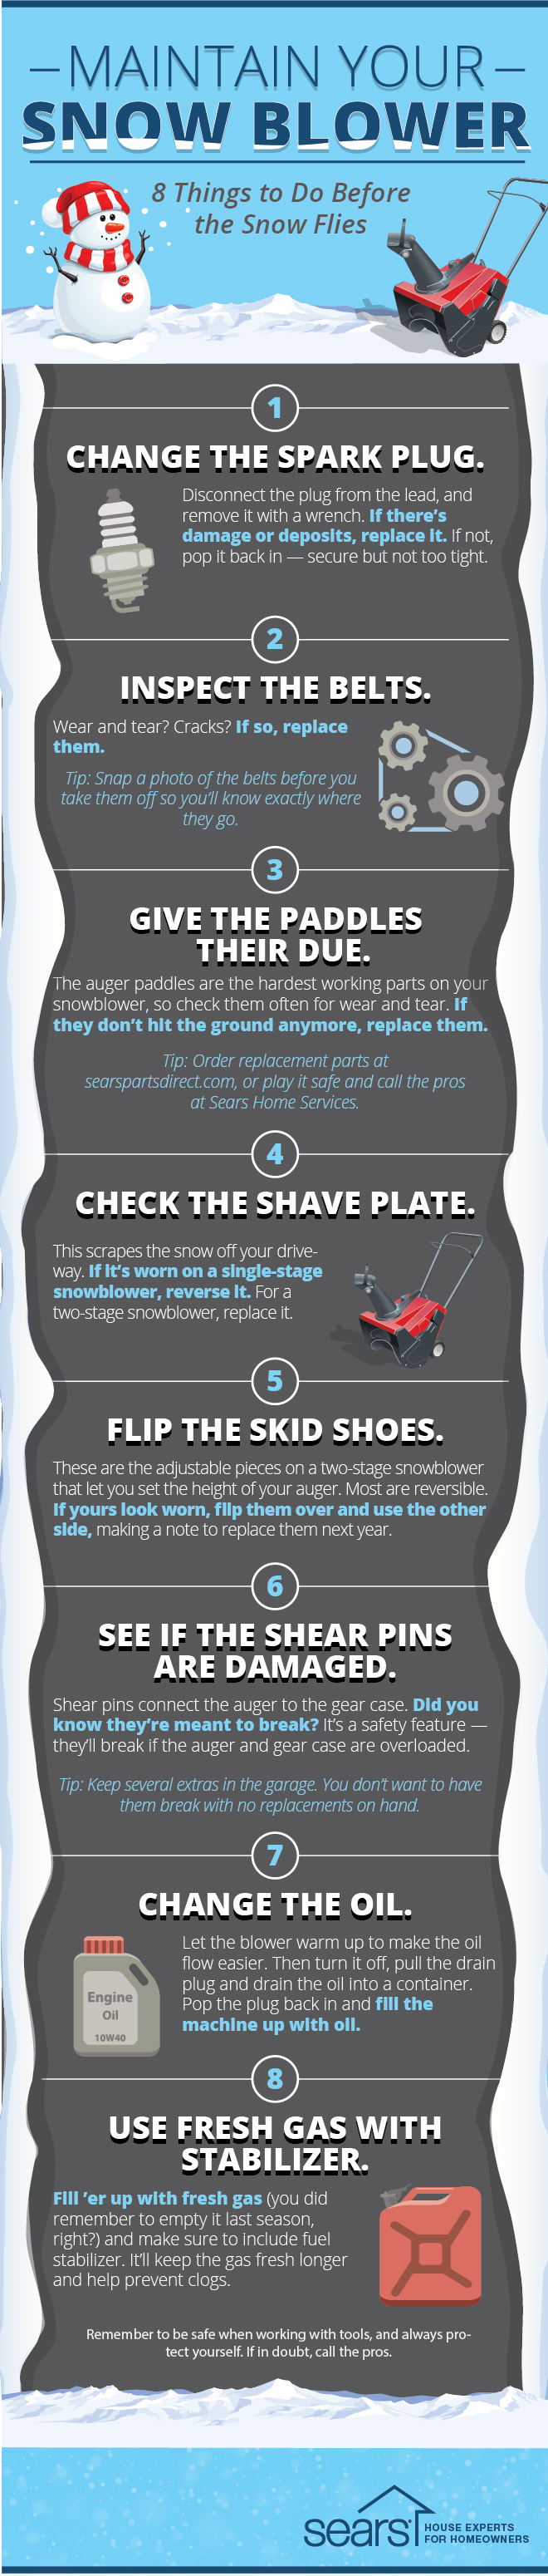
Avoid major repairs with routine care.
Pre-Season Maintenance
Fuel System:
– Drain old fuel
– Replace fuel filter
– Add stabilizer to fresh fuel
Engine:
– Replace spark plug
– Change engine oil
– Clean air filter
Mechanical:
– Inspect shear pins
– Check belt tension and condition
– Lubricate auger bearings and chute mechanism
Time: ~1 hour
Cost: Under $50
Post-Use Care
After each use:
– Clear snow buildup from housing
– Wipe down metal parts to prevent rust
– Store in dry, covered area
Never store with fuel in tank unless stabilized.
Consider Reliable Alternatives
Given widespread reliability concerns, many users recommend switching brands.
Top Recommended Brands
| Brand | Why It’s Better |
|---|---|
| Toro | Proven reliability, strong customer support |
| Ariens | Durable construction, excellent snow throw |
| Snapper | Smooth operation, good value |
What to Look For
When shopping for a replacement:
– Steel auger housing (not plastic)
– Easy chute control (single-lever rotation)
– Low maintenance design (accessible belts and shear pins)
– Cold-weather starting features (electric start, primer)
Quick Troubleshooting Reference
| Problem | Likely Cause | Solution |
|---|---|---|
| Won’t start | Old fuel | Drain tank and carburetor, refill |
| Won’t start | Flooded engine | Wait, no prime, full throttle |
| Won’t start | Bad spark plug | Clean or replace |
| Augers spin, no throw | Impeller shaft failure | Replace shaft (Part # 561211401) |
| One auger not turning | Broken shear pin | Replace pin |
| Poor drive | Worn belt | Replace belt |
| Excessive vibration | Imbalanced impeller | Inspect and repair |
| Hard to steer | Heavy design | Use in open areas, stage clearing |
Frequently Asked Questions About Husqvarna Snow Blower Problems
Why won’t my Husqvarna snow blower start even with fresh fuel?
If fresh fuel doesn’t solve the problem, check the spark plug condition, fuel filter, and choke/throttle settings. A clogged fuel filter or flooded engine are common culprits. Also verify the fuel shutoff valve is in the ON position.
What does it mean when augers spin but no snow comes out?
This typically indicates a broken impeller shaft or sheared drive key, not a gearbox failure. On the ST224, replacing the impeller shaft assembly (Part # 561211401) usually resolves the issue.
How do I fix a flooded Husqvarna engine?
Wait 5–10 minutes for fuel to evaporate, set throttle to full, disengage the choke, and pull the starter slowly without pressing the primer bulb.
What fuel should I use in my Husqvarna snow blower?
Use clean, fresh unleaded gasoline with a minimum 87 octane rating and no more than 10% ethanol (E10). Avoid E20, E30, and E85 fuels, as well as oil/fuel mixtures.
How can I prevent impeller shaft failure?
Clear rocks, ice, and debris before use, avoid forcing the blower into packed snow, and operate at lower speeds on uneven terrain. Some users install reinforced aftermarket shafts for added durability.
Is it worth repairing a Husqvarna snow blower?
For common issues like shear pins, belts, and impeller shafts, repairs are cost-effective. However, given reports of premature engine failure and poor warranty support, many users recommend replacing the machine with a more reliable brand like Toro or Ariens.
Key Takeaways for Solving Husqvarna Snow Blower Problems
Most Husqvarna snow blower problems stem from preventable issues like old fuel, clogged filters, and neglected maintenance. Starting failures usually trace back to fuel quality, choke settings, or spark plug condition. The notorious “augers spin, no throw” symptom almost always points to a broken impeller shaft or drive key, which is a straightforward repair using Part # 561211401 for the ST224.
Your next step: start with the simplest checks first. Drain old fuel, inspect the spark plug, and confirm the fuel valve is open before assuming mechanical failure. If discharge issues persist, inspect the impeller shaft before investing in a new gearbox. For long-term reliability, weigh repair costs against replacement, since many owners find better value in switching to Toro, Ariens, or Snapper.



