
Cold hands while clearing snow aren’t just uncomfortable; they slow your reactions and increase fatigue. When your Husqvarna snow blower heated grips stop working, you lose comfort, control, and safety in one shot. This guide covers the most common causes and proven fixes for Husqvarna ST224, ST227, and ST230 models with heated grips.
You will learn how to test wiring with a multimeter, pinpoint failed parts, and avoid replacing components you don’t need. Most problems come down to broken wires, a bad switch, or a dead heating element, not the generator. With basic tools and the right steps, you can restore full heat in under an hour.
How Husqvarna’s Heated Grip System Works

Before you start testing, it helps to know how power flows from the engine to your hands. This system uses engine motion to generate electricity, then routes it through a switch to your grips and the carburetor.
Power Generation from the Flywheel Magnet
A magnet embedded in the flywheel spins past a generator coil as the engine runs. This motion induces electrical current without needing a battery. Power only flows when the engine is on. If your grips stay cold with the engine running, the fault sits downstream in the wiring, switch, or heating elements.
Three-Point Power Distribution
From the generator, a red power wire runs to the heater switch. The switch then sends power to three components:
– Main handlebar heating pad
– Rear throttle grip
– Carburetor heater with a built-in thermostat
The carburetor heater only activates below roughly 10°C (14°F) to prevent icing during cold starts. In regions with mild winters, many owners disconnect this circuit to send more power to the grips for stronger heat.
Ground Circuit Completion
A black ground wire connects the system to the engine cylinder, completing the circuit. A loose, corroded, or broken ground kills the entire heating system, even if every other part works fine.
Top Reasons Husqvarna Heated Grips Fail
Most failures trace to a handful of common issues. Knowing what to look for saves you time and money on unnecessary parts.
Broken or Pinched Wiring
Damaged wiring causes the majority of heated grip problems. Watch for:
– Wires pinched under the flywheel cover
– Internal breaks inside handlebar housings
– Frayed connections near pivot points
Wires can look fine when still but break under movement. Always test them under light tension.
Failed Heating Element
The element inside the handlebar or grip can burn out from:
– Physical damage like bent handlebars
– Moisture entering the grip housing
– Overheating caused by a weak ground connection
A failed element shows infinite resistance (OL) on a multimeter.
Defective Heater Switch
The switch controls when power flows. When it fails, you may see:
– No heat anywhere
– Intermittent operation
– Switch stuck in one position
Test the switch before assuming other parts are bad.
Generator or Mounting Problems
True generator failure is uncommon. It usually happens only when:
– Mounting bolts are loose
– The coil rubs against the flywheel
– The flywheel magnet has detached
Check mounting integrity before replacing the coil.
Test Wiring with a Multimeter
A multimeter in continuity (beep) mode is your best tool for finding broken wires. Follow these tests in order.
Check the Generator to Switch Path
- Set your multimeter to continuity mode
- Touch the leads together to confirm a beep
- Place one lead on the generator terminal
- Place the other lead on the switch input wire (red)
Results:
– Beep means the connection is good
– No beep means a broken wire, likely pinched under the flywheel cover
Pro Tip: When routing a replacement wire, use the designated channel under the cover to prevent future pinching.
Test the Heater Switch
- Disconnect both wires from the switch
- Place one multimeter lead on each terminal
- Toggle the switch between on and off
How to read the results:
– Beeps only in “on” = Switch works
– No beep in “on” = Switch has failed
– Beeps in both positions = Switch is internally shorted and needs replacement
Use an OEM Husqvarna switch for the best cold-weather performance.
Inspect Wiring from Rear Grip to Handlebar
- Disconnect the power wire at the handlebar
- Test continuity between the wire exiting the rear grip element and the wire entering the handlebar heater
Dynamic Test: Gently tug the wire while testing.
– Steady beep = Solid connection
– Intermittent beep = Internal break; replace the wire
Diagnose a Failed Heating Element
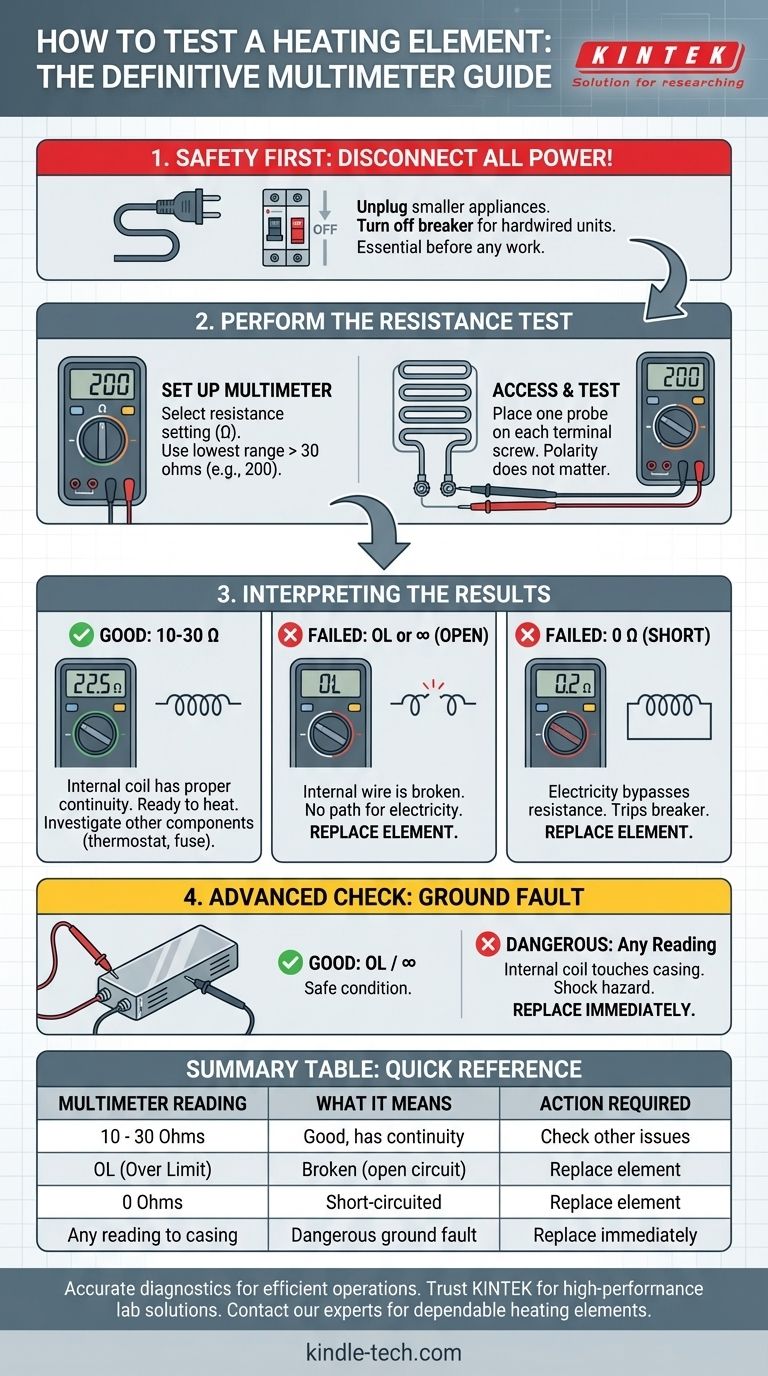
If power reaches the handle but you feel no heat, the element itself may be dead.
Measure Resistance Across the Terminals
- Set your multimeter to ohms (Ω)
- Touch the probes to the power and ground terminals on the handlebar or grip
Expected readings:
– 10 to 30 ohms = Healthy element (range varies by model)
– OL (infinite resistance) = Element is blown
Consult your service manual for the exact spec on your model.
Check for Physical Damage
Look closely for:
– Bent, cracked, or crushed handlebars
– Water or corrosion inside the grip housing
– Soft spots in the grip that signal internal failure
Warning: Even minor bends can rupture the internal heating wires. Replace the handlebar if you see damage.
Fix Common Installation Mistakes

Many “broken” systems are actually victims of skipped steps during installation. Walk through these checks before buying new parts.
Reinstall the Long 5/16″ Bolt
After mounting the heated handle base:
– Reinstall the long 5/16″ bolt into the power steering trigger housing
– This step is easy to miss and prevents proper function
Skipping it causes misalignment and wire strain.
Secure the C-Clip Properly
When reassembling the handle:
– Reattach the C-clip to the pivot pin
– Make sure it sits fully in the groove
– Use your fingers or a small tool; do not force it
A loose or missing C-clip leads to handle wobble and wire damage.
Route Wires Away from Moving Parts
During any installation work:
– Guide the wire behind the handle frame
– Keep it clear of auger control cables and pivot points
– Avoid pinching under mounting hardware
Pro Tip: Secure wires with zip ties to prevent movement and wear over time.
Repair or Replace Faulty Components
Once you find the problem, replace only what’s necessary. Targeted repairs save money.
Replace Damaged Wires
For broken internal wires:
– Cut out the damaged section
– Splice using weatherproof connectors
– Seal the connection with heat-shrink tubing
If multiple sections are compromised, replace the entire harness.
Install a New Heating Element
If the element is dead:
– Replace the complete handlebar assembly if the element is not sold separately
– Or install an aftermarket heated pad with adhesive backing
Match the voltage and resistance specs of the original part.
Upgrade to an OEM Switch
Aftermarket switches often fail early in cold weather. Choose a Husqvarna OEM heater switch for better sealing and longer life.
Optimize Heat Output in Mild Climates

If you live where sub-zero temperatures are rare, you can redirect power for warmer grips.
Disconnect the Carburetor Heater
- Locate the red wire running to the carburetor heater
- Disconnect it and insulate the end with electrical tape
- Seal the connection against moisture
Benefits:
– More power goes to the handlebar and rear grip
– Faster warm-up time
– Reduced electrical load on the generator
Note: Only do this if you do not need carburetor anti-icing.
Switch to Winter-Ready Air Filters
Replace standard flock filters with nylon mesh (black or white) filters:
– Resists moisture and ice buildup
– Maintains airflow in wet snow
– Easier to clean and reuse
Avoid filters that trap snow, which can stall the engine.
Prevent Future Heated Grip Failures
Simple maintenance habits stop most problems before they start.
Secure Generator Mounting Bolts
Check the generator coil mounting each year:
– Tighten bolts with blue Loctite
– Prevents vibration-induced loosening
– Stops the coil from rubbing the flywheel
Add this to your annual tune-up.
Inspect Wiring Before Each Season
Before the first snowfall:
– Check all heating wires for fraying
– Confirm connections are tight and dry
– Test continuity under light tension
Catching problems early keeps you warm mid-storm.
Install a Snow Cover on the Starter
Add a snow cover over the starter housing:
– Prevents snow ingress during operation
– Reduces moisture in electrical components
– Extends the life of the switch and wiring
Quick-Reference Diagnosis Chart
| Symptom | Likely Cause | Action |
|---|---|---|
| No heat, engine running | Broken wire or bad switch | Test continuity from generator to switch |
| Intermittent heat | Stretched internal wire | Test under tension; replace if spongy |
| One grip cold, other hot | Failed element or wire break | Test element resistance |
| All components cold | Ground wire loose | Check black wire connection to cylinder |
| Slow warm-up | Carburetor heater drawing power | Disconnect in mild climates |
Frequently Asked Questions About Husqvarna Snow Blower Heated Grips
Why are my Husqvarna snow blower heated grips not getting hot?
The most common cause is a broken wire between the generator and the heater switch, or a failed heating element. Test wiring continuity first, then check the element resistance. Generator failure is rare.
How do I test Husqvarna heated grips with a multimeter?
Set your multimeter to continuity (beep) mode. Test the path from the generator to the switch, then test the switch itself, then test the wiring from the rear grip to the handlebar. Finally, measure resistance across the heating element. A healthy element reads 10 to 30 ohms.
Can I disconnect the carburetor heater to get more heat to the grips?
Yes. In mild climates where temperatures rarely drop below 10°C (14°F), you can disconnect the red wire to the carburetor heater. This redirects more generator power to the handlebar and rear grip for stronger, faster heating.
How much does it cost to add heated grips to a Husqvarna snow blower?
Aftermarket retrofit installations cost $400 or more. Factory-equipped models with heated grips cost only about $100 extra when buying new. Choosing the factory option saves you around $300.
What tools do I need to diagnose heated grip problems?
You need a multimeter with continuity (beep) mode, basic hand tools, and for installation work: a flathead screwdriver, a 5/16″ socket, a 3/8″ socket, and a T30 hex driver. The multimeter does most of the diagnostic work.
Why does one grip work but the other stays cold?
This usually means a broken wire between the two grips or a failed heating element in the cold grip. Test the wiring continuity between the rear grip and the handlebar, then measure the resistance of the dead element. A reading of OL (infinite resistance) confirms a blown element.
Key Takeaways for Restoring Your Husqvarna Heated Grips
Most Husqvarna snow blower heated grip problems come down to three things: broken wires, a bad switch, or a dead heating element. The generator is rarely the culprit. Start every diagnosis with a continuity test from the generator to the switch, then work your way through the system.
Use the dynamic test (tugging wires while testing) to catch intermittent breaks that static tests miss. A healthy element always reads between 10 and 30 ohms. If you install aftermarket grips, factory-equipped models offer far better value at around $100 extra versus $400+ for retrofits.
Your next step: grab a multimeter, run the four tests outlined above, and identify the exact fault before ordering any parts. You will likely fix the problem in under an hour with basic tools.



