Installing a lawn sprinkler system transforms your yard into a lush, healthy landscape with minimal effort. Whether you’re tired of dragging hoses across the lawn or want precise watering for different garden zones, an automated system delivers water exactly where and when it’s needed. The key to success lies in proper planning, accurate measurements, and step-by-step execution. This guide walks you through every stage, from assessing your water supply to programming your controller, so you can install a reliable, efficient sprinkler system that keeps your lawn green all season.
Assess Water Supply and Pressure

Before laying any pipe, you must understand your water system’s capacity. A sprinkler system only works well if it matches your available pressure and flow.
Measure Static Water Pressure
Use a pressure gauge that screws onto an outdoor spigot. Turn the water on fully and read the PSI (pounds per square inch).
The ideal range is 30 to 80 PSI. Below 30 PSI results in weak spray and poor coverage, while above 80 PSI risks leaks or burst pipes. If your pressure exceeds 80 PSI, install a pressure regulator. Test at the point where you’ll tap into the main line for the most accurate reading.
Calculate Flow Rate
Your system’s flow rate determines how many sprinklers can run at once. Use the bucket method to measure it.
Grab a 5-gallon bucket and time how long it takes to fill from a fully open spigot. Use this formula: GPM equals 5 times 60, divided by seconds to fill. Twenty seconds equals 15 GPM, while 30 seconds equals 10 GPM. Systems under 10 GPM may need more zones or fewer heads per zone.
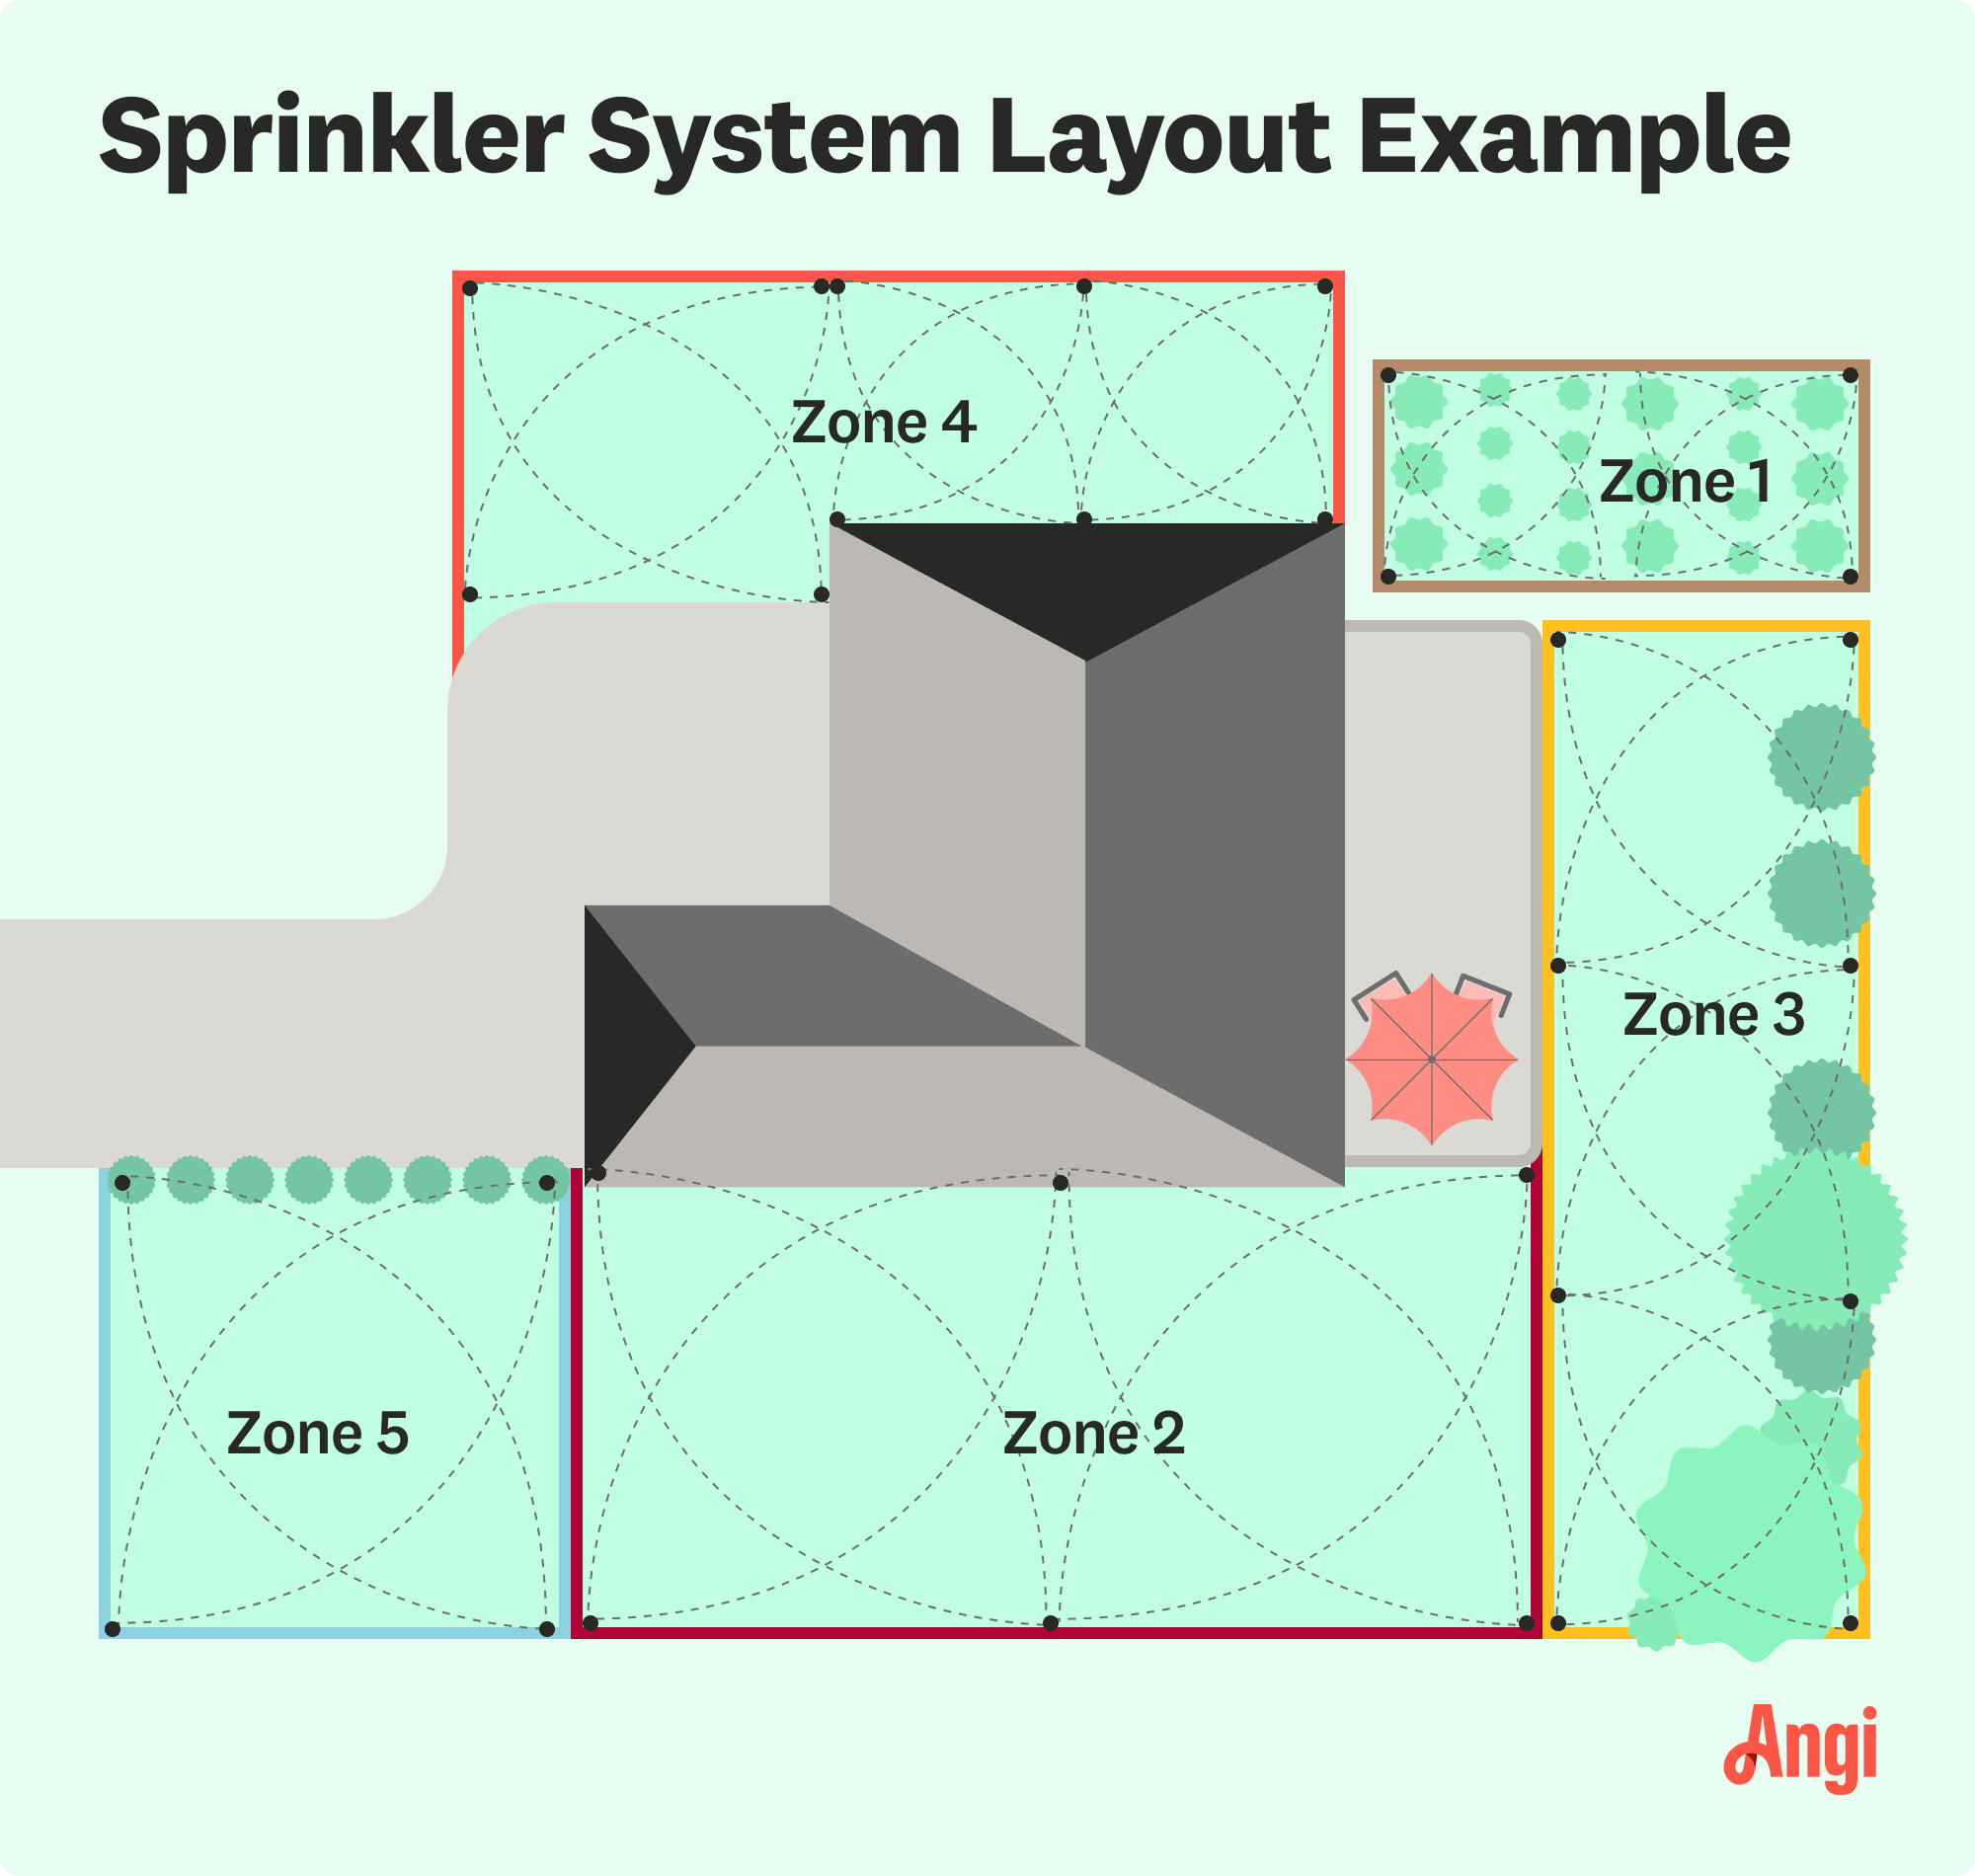
Plan Zones by Water Demand
Divide your yard into zones based on water needs. Grass areas in full sun require high water, garden beds and shrubs need medium, and succulents or shaded spots need low. Each zone should not exceed your total GPM. For example, a 12 GPM supply can support one zone of 12 GPM sprinklers but not two zones at 8 GPM each.
Design System Layout on Paper
A precise layout prevents coverage gaps and overspray. Plan every head’s location before digging.
Draw a Scale Yard Map
Use graph paper or free irrigation design software to mark your house, driveway, trees, and flower beds. Note sun exposure, slopes, and soil type. Indicate your water source location. Each square can represent 1 foot or 2 feet, depending on your yard size.
Choose Sprinkler Head Types
Match heads to your landscape zones. Pop-up spray heads work best for lawns with 90-degree, 180-degree, 270-degree, and 360-degree pattern options. Rotary nozzles suit large, open areas with adjustable arcs and long reach. Adjustable arc heads work for odd-shaped beds, and drip lines deliver low-flow, targeted water to gardens and pots. Use 4-inch pop-ups for tall grass and 2-inch for short lawns to avoid mower damage.
Apply Head-to-Head Coverage
This is the golden rule: spray from one head should reach the next. If a sprinkler sprays 8 feet, place heads 8 feet apart to ensure 50 percent overlap and eliminate dry spots. Use manufacturer charts to match spray distance to your PSI.
Select Pipes, Valves, and Fittings
Choosing the right materials ensures durability and leak-free performance.
Pick Pipe Type by Climate
Polyethylene pipe works best in cold climates because it’s flexible and freeze-tolerant. PVC suits mild climates and is rigid and long-lasting. Use flexible PVC for laterals since it bends easily without glue. Drip tubing serves garden zones with low-flow, targeted delivery. Buy 10 to 15 percent extra fittings since you’ll likely need spares.
Essential Fittings and Valves
Stock up on T-fittings to branch to sprinkler heads, elbows to change direction, and couplings to join pipe sections. Saddle tees let you tap into the mainline without cutting. Use barbed fittings with ratchet clamps for poly pipe and thread seal tape for threaded joints. Choose anti-siphon valves for spigot connections to prevent backflow, and install an RPZ backflow preventer for main-line taps.
Call 811 Before You Dig
Hitting a gas line or electrical conduit can be deadly. Always verify underground utilities before trenching.
Contact Your Local Service
In the U.S., call 811 or visit call811.com to request utility marking 2 to 3 days before digging. Wait for professionals to mark water, gas, electric, sewer, and internet lines. Fines for unmarked digging can exceed $10,000, so never guess.
Mark Your Layout
After utilities are flagged, use paint spray or flags to mark your sprinkler routes. Double-check distances from marked lines and hand-dig near any utility markers. Take photos of marked lines for reference during trenching.
Dig Trenches to Proper Depth
Trench depth protects pipes from freezing and lawn equipment damage.
Follow Depth Guidelines
General depth is 6 to 12 inches. In cold climates, go below the frost line, often 12 to 18 inches. PVC requires a minimum of 6 inches, while poly pipe needs 4 to 5 inches if protected. Shallow trenches risk mower damage, while deep ones increase labor.
Use the Right Tools
A hand shovel works for small yards or tight spaces. A trenching shovel creates cleaner, straighter cuts. Rent a power trencher for large jobs since it cuts 100 feet in minutes. A Ditch Witch suits long runs with minimal surface disruption.
Cross Driveways Safely
Use water pressure drilling to go under driveways. Attach a jet nozzle to a long PVC pipe and push under the driveway while spraying water to erode soil slowly. Pull pipe through once the exit hole is made.
Lay and Connect Pipes
Proper pipe installation prevents leaks and pressure loss.
Unroll and Position Pipe
Let pipe relax in the sun for 30 minutes to reduce kinks before laying it along the trench. Avoid sharp bends and secure with irrigation pins every 2 to 3 feet.
Join PVC Pipe Correctly
Cut the pipe square with a PVC cutter, then deburr inside and outside edges. Apply purple primer to pipe and fitting, then coat with PVC cement. Insert and twist a quarter turn, then hold for 10 to 15 seconds before wiping excess. Wait 30 minutes or more before pressurizing. Never look into open pipe ends since cement can splash.
Connect Polyethylene Pipe
Slide a ratchet clamp onto the pipe, then insert the barbed fitting. Slide the clamp over the joint and tighten. For saddle tees, clamp onto the mainline and turn the tap to pierce and seal. Tapered poly fittings seal by compression, so no Teflon tape is needed.
Install Sprinkler Heads Properly
Correct head placement ensures even watering and avoids damage.
Position Heads at Ground Level
The top of pop-up heads should be flush with soil or slightly below. Keep a half-inch clearance from walls, driveways, and fences. In driveways, install heads below surface to avoid plow damage.
Use Swing Joints for Flexibility
A swing joint uses short risers and elbows between the pipe and head. It absorbs ground movement, prevents pipe stress, and makes leveling easier. Use Marlock fittings for no-glue, no-crimp connections with Hunter heads.
Connect Heads with T-Fittings
Cut the mainline at the head location and insert a threaded T-fitting. Secure with ratchet clamps and screw the head directly into the fitting. Avoid gluing sprinkler heads directly since that makes future replacement difficult.
Connect to Water Source Safely
How you tap into water affects system performance and code compliance.
Spigot Connection Option
Use a freeway adapter or click-on fitting for a DIY-friendly approach. Install an anti-siphon valve inline and add an isolation valve for maintenance. This option works best for small yards and low-pressure systems.
Main Line Tap Option
Tap after the water meter, downstream of the house. Use three-quarter-inch or 1-inch PEX to minimize pressure drop. Install an RPZ backflow preventer required in many cities, and add a drain line to the basement or safe outlet. Cutting main lines usually requires a licensed plumber.
Install Backflow Preventer
This protects drinking water from contamination. Use an anti-siphon valve for spigot systems and an RPZ device for main-line taps. The backflow preventer must be tested annually by a certified technician.
Flush Lines and Install Nozzles
Flushing removes dirt and debris that clog nozzles.
Flush Each Zone
Remove nozzles or keep heads disconnected. Open the first zone valve manually and turn on water slowly at the isolation valve. Let water run for 1 to 2 minutes, checking for clear flow. Close the valve and repeat for the next zone. Remove the nozzle from the last head on each line since it ejects the most debris.
Choose and Align Nozzles
Match nozzles to zone type. Use full circle for open lawn, half circle along fences, quarter circle for corners, and adjustable for irregular shapes. Set the radius with a screwdriver per manufacturer specs. Turn on the system and adjust each head so spray reaches the next head. Prevent water on sidewalks, driveways, or walls.
Backfill Trenches and Restore Lawn
Proper backfilling prevents sinkholes and pipe damage.
Fill with Clean Soil
Use original soil from the trench and remove rocks, roots, and debris. Gently tamp every 2 to 3 inches, but do not over-pack since that can crush pipes.
Replace Sod Immediately
Lay sod back before testing if possible. If tested first, re-lay sod and water thoroughly. Keep soil moist for 7 to 10 days to re-establish roots. Use a lawn roller to smooth seams and ensure contact.
Assemble Valve Manifold and Wiring
The valve box controls water flow to each zone.
Build Manifold Outside Box
Use a 6-zone irrigation box even for fewer zones to allow expansion. Assemble valves and fittings, ensuring flow arrows point correctly. Crimp all joints and double-crimp high-pressure zones. Place filter fabric under the manifold for easy cleaning.
Run and Connect Wires
Use 13-strand shielded wire from the manifold to the controller. Protect above-ground runs with PVC conduit. Color-code wires with white for common, red, blue, or green for zones, and purple for master valve. Use grease-filled merrette connectors for waterproof joints and leave 1 to 2 feet extra wire at both ends.
Mount and Program Controller
Install in a dry, accessible location near an outlet and use a backing board for secure mounting. Program watering days, start time (4 to 6 AM is ideal), duration per zone (5 to 15 minutes), and multiple programs for spring, summer, and drought conditions. Enable seasonal adjustment to scale watering up or down based on weather.
Test and Commission the System
Final testing catches issues before backfilling.
Run Each Zone
Turn on water slowly and activate zones via timer. Check for leaks at joints, proper head pop-up, even coverage, and no overspray. Re-tighten leaking connections and re-adjust misaligned heads. Verify the backflow preventer has sealed test ports and confirm no dripping when off.
Maintain and Winterize Yearly
Proper care extends system life and efficiency.
Monthly Checks
Inspect for sunken heads, clogs, or leaks. Clean nozzle screens and adjust heads as grass grows.
Winterize in Cold Climates
Shut off water and blow out lines with compressed air (40 to 80 PSI). Drain valves and pipes, then insulate above-ground components. Never use oxygen since it can cause explosions.
Spring Startup
Reconnect the system, flush lines again, and test all zones. Update timer settings for the new season and run a cycle test before full programming.
Frequently Asked Questions About Installing a Lawn Sprinkler System
How long does it take to install a sprinkler system yourself?
A DIY installation typically takes one full weekend for an average-sized residential yard. Larger properties or complex layouts may require additional time. Professional installation usually completes in 1 to 2 days.
Can I install a sprinkler system without calling 811?
No. Calling 811 is legally required before any digging in the U.S. Failure to call can result in fines exceeding $10,000 and serious injury from hitting underground utilities.
How deep should sprinkler pipes be buried?
General depth is 6 to 12 inches. In freezing climates, bury pipes below the frost line, typically 12 to 18 inches deep. Shallower burial risks mower damage and freeze cracking.
Do I need a permit to install a sprinkler system?
Permit requirements vary by location. Many municipalities require permits and inspections, especially for main-line taps and backflow prevention devices. Check with your local building department before starting.
How much does a professional sprinkler system installation cost?
Professional installation typically costs $1,500 to $3,500 for an average yard, depending on property size, number of zones, and local labor rates. DIY materials usually cost $500 to $1,500.
When is the best time to install a sprinkler system?
Fall is ideal since the lawn recovers within 10 days and is ready for spring. Spring installation works but may stress new sod during hot summer months.
Key Takeaways for Installing Your Sprinkler System
Installing a lawn sprinkler system is a weekend-long project that pays off for years with a greener lawn, lower water bills, and hands-free watering. Always assess your water pressure and flow rate first since these measurements determine how many sprinkler heads each zone can support. Design your layout with head-to-head coverage to eliminate dry spots, and call 811 before digging to avoid hitting underground utilities. Choose materials suited to your climate, install backflow prevention as required by code, and flush all lines before attaching nozzles. Follow this guide step by step, and you’ll build a system that’s efficient, durable, and fully automated.