Is your metal patio set looking dull, rusted, or outdated? Before you replace it, consider refinishing instead. Refinishing metal lawn furniture is a smart, affordable way to breathe new life into old pieces, often for less than $50. Whether it’s a vintage wrought iron glider or oxidized aluminum chairs from the curb, proper restoration can make them look store-bought again. This guide walks you through every step, from assessing damage and removing rust to priming, painting, and sealing, so you get durable results that last 5 to 10 years or more.
With the right tools, paint, and prep, you can achieve a professional-grade finish that resists weather, UV rays, and rust. The process takes 2 to 5 days total, but the results are worth the wait. Each section below provides actionable steps, product recommendations, and expert tips to help you refinish metal lawn furniture like a pro.
Assess Damage and Plan Your Project
Before picking up a spray can, evaluate your furniture’s condition to determine if refinishing is worth the effort.
Check for Structural Integrity
Examine legs, joints, and welds for cracks, deep pitting, or bends. If the frame wobbles or metal feels thin and brittle, replacement may be safer. However, if only the surface is damaged, the piece is likely a perfect candidate for refinishing. Most metal damage occurs on the surface while the underlying frame remains structurally sound.
Identify the Metal Type
Different metals require different approaches. Knowing your material guides every decision.
• Wrought Iron or Steel: Prone to rust, needs aggressive prep and rust-inhibiting primer
• Aluminum: Does not rust but oxidizes into a dull gray film, responds well to light sanding and self-etching primer
• Stainless Steel: Rarely needs repainting unless coated, clean and recoat as needed
• Cast Iron: Heavy-duty but vulnerable to deep corrosion, requires full stripping if heavily rusted
Decide: Restore or Replace
Restoration wins for cost, customization, and sustainability. A full DIY refresh costs $20 to $100, while buying new matching sets starts at $200 and climbs fast. Plus, refinishing saves furniture from landfills and preserves sentimental or heirloom pieces.
Set Up a Safe, Efficient Work Area
A clean, controlled space ensures better results and protects your health.
Choose an Outdoor or Ventilated Workspace
Work outside on a calm, dry day to avoid overspray drift. If using a garage, open doors and windows. Never spray paint in enclosed indoor spaces without proper ventilation and respiratory protection.
Protect the Surroundings
Lay down thick plastic sheeting or canvas drop cloths. Secure edges with bricks and use spring clamps to attach plastic to tables or walls. This keeps overspray off grass, pavement, and nearby objects.
Wear Full Safety Gear
Proper PPE is essential when working with chemicals and spray paint.
• Respirator with organic vapor cartridges, not a dust mask
• Safety goggles to block flying debris
• Nitrile gloves when handling chemicals
• Long sleeves and pants to protect skin from dust and overspray
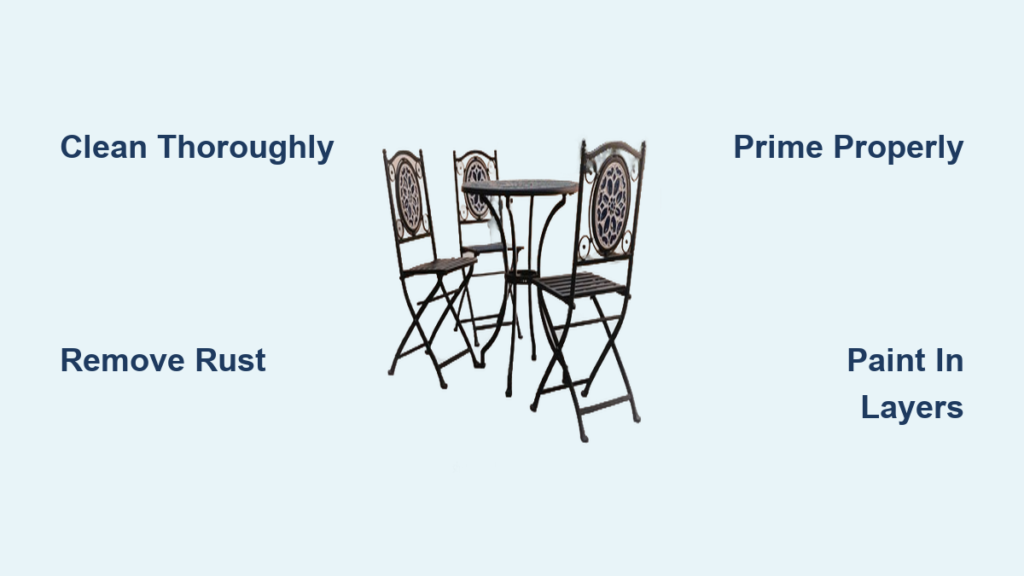
Clean Furniture Thoroughly
Dirt, grease, and mildew prevent paint from sticking. Clean first, always.
Wash with Soap and Water
Mix warm water with mild dish soap. Scrub all surfaces with a sponge or soft brush. Pay extra attention to crevices and joints where grime builds up.
Treat Stubborn Stains and Mildew
For mold or heavy residue, use a 50/50 mix of white vinegar and water. Apply, let sit 10 minutes, then scrub and rinse. Alternatively, use Krud Kutter Outdoor Cleaner for faster results.
Pressure Wash (Optional)
Use a 1500 to 1800 PSI electric pressure washer to blast off loose paint, mildew, and debris. Keep the nozzle at least 12 inches away to avoid denting thin metal. Let pieces dry completely, overnight is best, before moving to the next step.
Remove Rust and Old Paint
This is where most of the work happens. The better the prep, the longer your finish lasts.
Use Wire Brushes for Tight Spots
A stiff wire brush removes flaking paint and surface rust from legs, joints, and ornate details. Work in small sections, brushing in one direction for even results.
Scrape Off Thick Paint Layers
Use a metal paint scraper for large areas with peeling or bubbled paint. Hold at a low angle to avoid gouging the metal.
Sand Large Surfaces
Fit a random orbital sander with 80 to 120 grit sandpaper for initial stripping. Sand until all loose material is gone and the surface feels uniformly rough. For aluminum or final smoothing, switch to 220 grit.
Try a Rotary Tool for Detail Work
Attach a wire wheel to a Dremel or similar tool to clean intricate scrollwork or hard-to-reach joints. Move slowly to avoid overheating the metal.
Wipe Down After Sanding
Use a damp cloth or tack cloth to remove all dust. Any leftover particles will show under paint and ruin your finish.
Treat Active Rust Chemically

Rust does not stop on its own. Stabilize it before priming.
Skip Dangerous Acids
Avoid nitric or acetic acid-based rust removers. They are toxic, hard to handle, and not worth the risk.
Apply a Rust Converter
Use a product like Rust-Oleum Rust Reformer. It turns rust into a stable black compound that will not spread. Spray or brush it directly onto rusted areas. Let it dry fully, usually 24 hours, before priming.
Pro Tip: Rust converter does not replace mechanical removal. Always brush or sand off loose rust first.
Prime for Maximum Adhesion
Primer is non-negotiable. It bonds paint to metal and blocks future rust.
Pick the Right Primer
Choose based on your metal type for best results.
• Rust-inhibiting primer for steel and iron
• Self-etching primer for aluminum or bare metal
• Dual-action spray like Rust-Oleum 2X Ultra Cover Paint + Primer to save steps
Apply Primer Correctly
Shake the can hard for 60 seconds. Hold 10 inches from the surface. Use smooth, overlapping side-to-side passes. Apply 2 to 3 light coats, waiting 30 minutes between each. Let final coat dry completely per label instructions.
Expert Note: Test your spray pattern on cardboard first. This helps you master motion and avoid drips.
Paint with Professional Results
Now comes the fun part, color. But technique matters more than hue.
Choose Outdoor-Grade Spray Paint
Select paints specifically rated for exterior metal use.
• Rust-Oleum Universal Metallics for metallic finishes
• Rust-Oleum Ultra Cover for solid colors with high opacity
• Painter’s Touch 2X for glossy finish with built-in primer
• Oil-based enamel for maximum durability
Pro Tip: For black furniture, try Oil-Rubbed Bronze. It looks deep black in most light but adds subtle warmth and hides imperfections better than flat black.
Paint in Ideal Conditions
Wait for the right weather before spraying.
• Temperatures between 50 to 90°F
• Humidity under 85%
• No wind or rain
Cold, damp, or windy days cause runs, blisters, or poor adhesion.
Use Thin, Multiple Coats
Apply 4 to 5 light coats, waiting 20 to 30 minutes between. Thick coats lead to drips and cracking. Each layer should be barely wet. Build gradually for the best finish.
Reach All Angles
Prop up chairs and tables on soup cans or blocks to paint undersides and legs. Flip pieces once the top is dry to the touch.
Seal with Clear Topcoat (Optional but Smart)
Add an extra layer of defense against sun and moisture.
Use UV-Resistant Clear Enamel
A product like Rust-Oleum Clear Enamel protects against fading and chalking. Apply 1 to 2 light coats after paint has dried.
Match the Sheen
Use semi-gloss clear over semi-gloss paint. Mixing finishes creates an uneven, patchy look.
Let It Cure Fully
Wait at least 24 hours before using the furniture. Full cure can take up to 7 days depending on humidity.
Avoid Common DIY Mistakes
Even small errors ruin great prep work.
Skipping Sanding
Paint will not stick to glossy or dirty surfaces. Always sand and wipe down before priming.
Applying Thick Coats
One heavy coat causes runs. Use multiple light layers instead.
Painting in Bad Weather
High humidity or rain traps moisture under paint, causing bubbles. Wait for dry conditions.
Forgetting Primer
Bare metal will flash-rust and cause peeling. Always prime.
Using Indoor Paint Outdoors
Indoor paints lack UV and moisture resistance. They fade and chip fast. Use only outdoor-rated metal paint.
Neglecting Safety Gear
Spray paint fumes are harmful. Always wear a respirator, goggles, and gloves.
Consider Alternative Methods
For extreme cases, other options exist, but they are not always better.
Chemical Stripping
Use Goof Off or paint stripper only if you need to remove every trace of old paint. It is messy, smelly, and requires careful disposal. Not needed for most refresh projects.
Sandblasting
Fast and thorough for heavily pitted or multi-layered pieces. Rent a unit or hire a pro. Best for large jobs or commercial restoration.
Powder Coating
Durable, thick finish baked in an oven. Pros include chip resistance and long-lasting results. Cons include expensive cost of $200 to $500 per piece, requires disassembly, and limited touch-up ability.
Reality Check: Many pro services use high-quality spray paint, not powder coating. You can get similar results DIY for a fraction of the cost.
Maintain Your Refinished Furniture
A little care extends life by years.
Clean Regularly
Wash with mild soap and water. Rinse well. Avoid abrasive scrubbers that scratch paint.
Dry After Wet Weather
Wipe off dew or rain to prevent moisture buildup, especially in joints.
Inspect Annually
Look for early signs of rust, chipping, or wear. Touch up small spots immediately with primer and paint.
Use Furniture Covers
Protect pieces during winter or storms. Store indoors if possible.
Reapply Clear Coat
Every 1 to 2 years, add a fresh clear coat for extra UV protection, especially in sunny or humid climates.
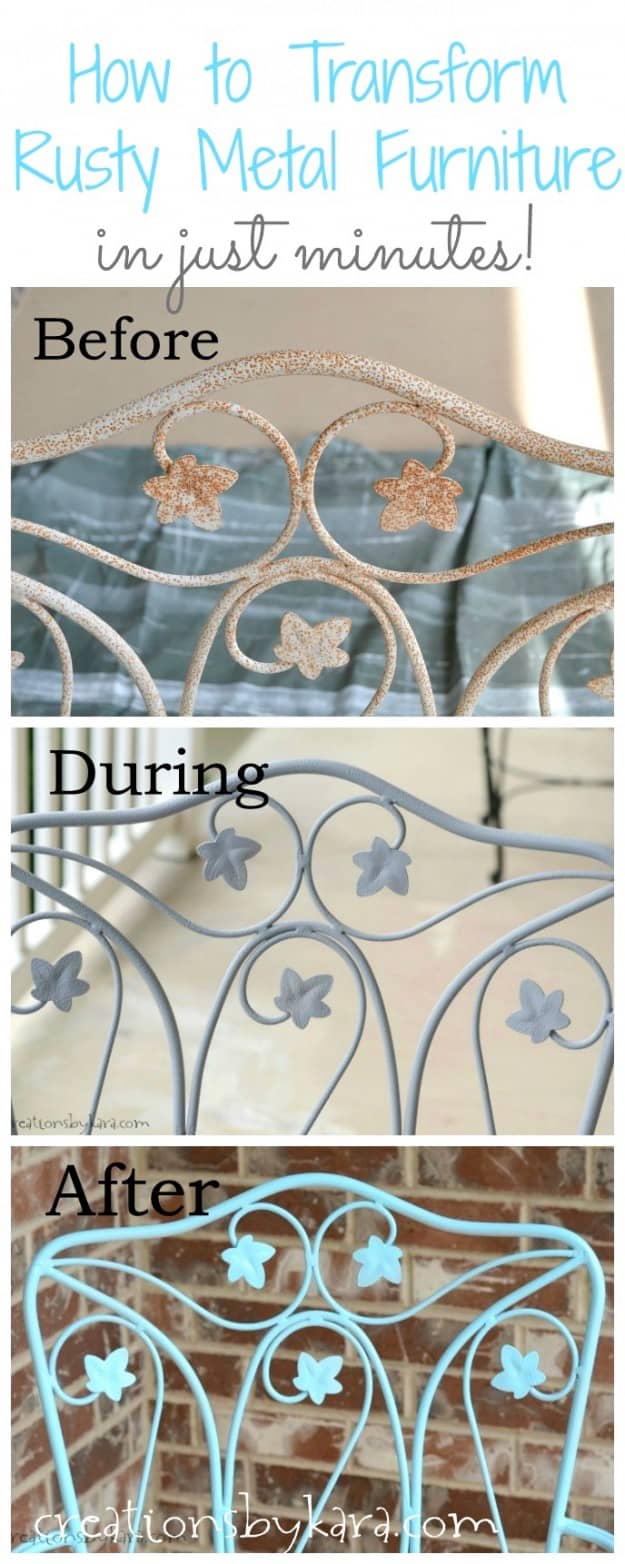
Real Results on a Budget
DIY refinishing delivers professional results at a fraction of the cost. A vintage wrought iron glider, 25+ years old, was restored with just a wire brush, sander, Rust-Oleum primer, and spray paint, now looks brand new. Two aluminum chaise lounges bought cheap on Facebook Marketplace were refinished for under $30 total. Even a $300 professional refinishing job on an heirloom swing was just high-end spray paint, something you can do yourself.
Frequently Asked Questions About Refinishing Metal Lawn Furniture
How long does refinished metal furniture last?
Properly refinished metal lawn furniture can last 5 to 10 years or more, depending on climate, materials used, and maintenance. Applying a clear UV-resistant topcoat and using furniture covers extends the life significantly.
Can I refinish aluminum lawn furniture?
Yes, aluminum does not rust but does oxidize into a dull gray film. Clean the oxidation, sand lightly with 220 grit sandpaper, and use a self-etching primer before painting. The process is similar to refinishing other metals.
Do I need to remove all rust before painting?
You need to remove loose, flaking rust mechanically with a wire brush or sander. Active rust can be stabilized with a rust converter. The key is ensuring no loose rust remains before priming, as it will continue to spread under the paint.
What type of spray paint is best for outdoor metal furniture?
Rust-Oleum Universal, Rust-Oleum Ultra Cover, and oil-based enamel sprays are all excellent choices. Look for paints labeled specifically for outdoor metal use. Products with built-in primer like Painter’s Touch 2X save steps and ensure better adhesion.
Can I use a pressure washer to clean the furniture?
Yes, use 1500 to 1800 PSI and keep the nozzle at least 12 inches away to avoid denting thin metal. Let the furniture dry completely, preferably overnight, before proceeding to sanding and painting.
Key Takeaways for Refinishing Metal Lawn Furniture
Refinishing metal lawn furniture is a rewarding DIY project that costs a fraction of replacement. The success lies in thorough preparation: clean the furniture, remove all loose rust and paint, sand to create a rough surface for adhesion, and never skip the primer. Choose outdoor-rated spray paint and apply multiple thin coats rather than one thick layer. For extra protection, add a UV-resistant clear topcoat and maintain the furniture annually. With proper technique and quality materials, anyone can achieve professional-looking results that last a decade or more. Start with a small piece to practice your technique, then tackle that full patio set you have been thinking about replacing.